Creating Component in .Net
What is Component?
It is a set pre-compiled class, which is reusable. For now, just stick to it at the end of article you will practically understand how it is reusable piece of code.
Advantages of Component
- Improving Application Performance
- Better Code Management and Maintenance
How Component can Improve Application Performance?
CLR is place where .Net Application codes gets compiled. Whenever you made an request to ASP.NET page, the page gets compiled first and then is transferred to the user. The compilation process is also completed in two steps.
- 1. An IL (Intermediate Language) is generated and then this is handed over for JIT
- 2. JIT (Just In Time) compilation which produces the machine code and our pages get displayed with their dynamic content.
The performance of our web application can be improved by creating pre-compiled libraries of IL which can then be handed over to JIT directly without having the inclusion of an extra process to make the conversion. This method is called componentization. Components are pre-compiled set of classes that have been developed in the form of DLL files and can then be included within our projects. This is also known as an assembly.
How Component can be used for Better Code Management and Maintenance
As we use Componentization(refer above description), if a code change require you need to change the component code compile it, so you do not require to change all the reference of code for minor change. For better understanding understand the example of component given below.
Example of Creating Component in .Net
Creating a simple demo of famous Class Shape Example, wherein simple functionality is added.
Step1: Create a Asp.net web application
Step2: Right click the solution explorer and add New Project "class library project"
For example, Delete the .CS File and Add Component using Project > Add New Component and Name it as csShape.cs
Note: By creating component you are actually creating assembly file and it has all the benefits that assembly has. You can edit all the assembly details by right clicking "Class Library Project" and Selecting Properties from popup window.
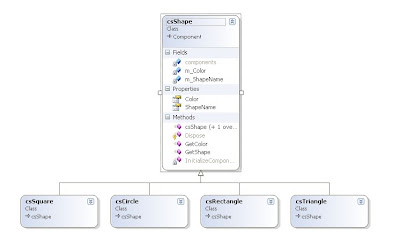
Step3: Created a Four Class as shown in Class Diagram

For better understanding download the Shape.CS File
Step4: Compile the Class Library Project
Step5: Add Reference to Project


Step6: Test the component.
Add namespace
using Shape;
protected void Page_Load(object sender, EventArgs e)
{
csShape objShape = new csShape();
Response.Write("
" + "I am " + objShape.ShapeName
+ " Object and my color is " + objShape.Color);
csCircle objCircle = new csCircle();
objCircle.Color = "Blue";
Response.Write("
" + "I am " + objCircle.ShapeName
+ " Object and my color is " + objCircle.Color);
csSquare objSquare = new csSquare();
objSquare.Color = "Green";
Response.Write("
" + "I am " + objSquare.ShapeName
+ " Object and my color is " + objSquare.Color);
csRectangle objRectangle = new csRectangle();
objRectangle.Color = "Orange";
Response.Write("
" + "I am " + objRectangle.ShapeName
+ " Object and my color is " + objRectangle.Color);
}
Output of Application

So now if you want to change the functionality of Shape class you can do it independently you just need to rebuild the class library application and all changes are reference without any extra effort.

No comments:
Post a Comment