Saturday, November 26, 2016

Installing .Net Core on Digital Ocean Hosting

Supporting .Net on Linux OS is the best thing Microsoft gifted to .Net Developers.  Linux hosting reduces cost, plus provide good stable support.

This post will walk you through how to get started by installing .Net Core on Digital Ocean Hosting.

I am assuming you already have created DigitalOcean Hosting account and are good to start by creating droplet.  Reason I have choose digital ocean is because it is cheap to get started and have freedom to scale as you grow.

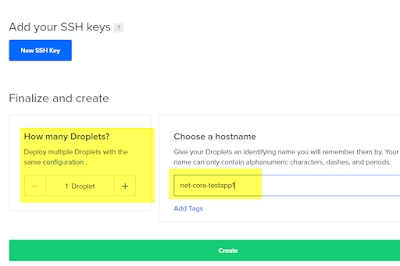
Step 1:  Create droplet.


Step 2: On creation of droplet:  Digital Ocean will send you an email with details of root password.


Step 3: 
Download SSH Client Putty to login into Ubuntu from Windows


Step 4: 
Login as root.  Use root password as sent by digital ocean in email.


Till this point we have setup Ubuntu OS.  


Step 5: Now we will install .Net Core.
I am following installation instruction from this url: https://www.microsoft.com/net/core#linuxubuntu

Commands for Ubuntu 16.04
1. sudo sh -c 'echo "deb [arch=amd64] https://apt-mo.trafficmanager.net/repos/dotnet-release/ xenial main" > /etc/apt/sources.list.d/dotnetdev.list'
2. sudo apt-key adv --keyserver hkp://keyserver.ubuntu.com:80 --recv-keys 417A0893
3. sudo apt-get update
  4. sudo apt-get install dotnet-dev-1.0.0-preview2.1-003177 


Step 6: Initialize some code
1. mkdir hwapp
2. cd hwapp
3. dotnet new


1. dotnet restore
2. dotnet run


---------------------------------------------------------------------------------------

If you want to access file system of your droplet then login as sftp://root@IPAddress from any popular ftp client.

I am using FileZilla Ftp Client.


If above post have truly helped you, then please use below Referral link for digital ocean.  This will help me in lowering down some of my researching cost.  Thank you!  https://m.do.co/c/8a610f2c11ab

Monday, April 04, 2016

Install Mongodb and run as a service to start automatically for windows

This blog post will explain where to download mongodb, how to install and how to configure to start service automatically.  

Step 1: Download mongodb, I am using community edition.  Follow step by step installation process to install mongodb.

After installation a directory inside C:\Program Files is created.  
Example:  In my case:  C:\Program Files\MongoDB\Server\[version]

Please note: [version] can be current version you have downloaded.  Example: 2.4

Step 2:  Move the Mongodb directory to c:\ for easy access. i.e. C:\MongoDB\Server\[version]

Step 3:  Create directories inside C:\MongoDB\Server\[version]
mkdir C:\MongoDB\Server\[version]\data
mkdir C:\MongoDB\Server\[version]\logfiles

Step 4: Create mongod.conf file in C:\MongoDB\Server\[version], Add following content in it and save the file.
# Where data files will reside
dbpath=C:\MongoDB\Server\[version]\data

# Where the log file will be stored
logpath=C:\MongoDB\Server\[version]\data\logfiles\mongo-server.log

# how verbose the server will be logging
verbose=vvvvv

Step 5:
Open command line as administrator.
Type following commands to start mongodb as service, so that you don't have to manually start mongo server each time.

C:\MongoDB\Server\[version]\bin> mongod -f C:\MongoDB\Server\[version]\mongod.conf --install

C:\MongoDB\Server\[version]\bin>net start MongoDB

And you are good to go.  Your mongodb is up and running.

-----------------

For creating database, collection and document for mongodb you can download robomongo which is nice GUI for mongodb.


That's it.  It is that easy.

--------------------

In case you are interested in installing mongodb on ubuntu then following link will be helpful.
https://www.youtube.com/watch?v=CkDd6jClqEE
https://www.digitalocean.com/community/tutorials/how-to-install-mongodb-on-ubuntu-16-04


Most Recent Post

Subscribe Blog via Email

Enter your email address:


Disclaimers:We have tried hard to provide accurate information, as a user, you agree that you bear sole responsibility for your own decisions to use any programs, documents, source code, tips, articles or any other information provided on this Blog.
Page copy protected against web site content infringement by Copyscape